Perspective correction using GIMP
Sep 16 2017 Sat
1:23 am PHT
As I mentioned on Facebook, a micro-hobby that I picked up recently is applying perspective correction on photos of NHCP historical markers in Wikimedia Commons such that they look as if they were photographed head-on and with horizontal edges looking horizontal and vertical edges looking vertical. An example result is the corrected photo of the Fort of San Pedro historical marker shown below.

And here is the original photo.

The complete list of photos I’ve already corrected can be found on Wikimedia Commons.
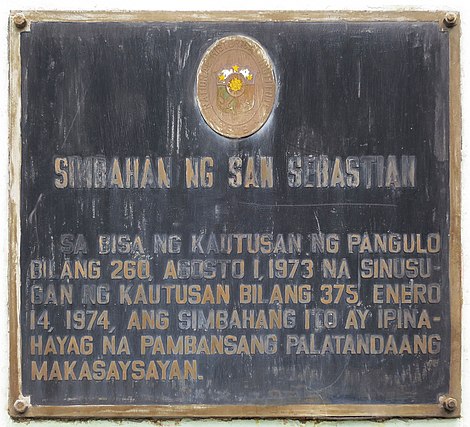
I will now explain the step-by-step procedure that I follow to do perspective correction on these photographs. For this “tutorial”, we will be using the open-source GIMP application. I’m quite sure a similar process can be done using Adobe Photoshop and there are plenty of tutorials online if you are so inclined. We will also be using a photo I took of a historical marker for the Sen Sebastian Church in Quiapo, Manila. Shown below is the original photo.

After opening the photograph in GIMP, the first step is to expand the canvas to give us room to work with.

Next, we correct the obvious barrel distortion in the image. This is a type of distortion where lines that are supposed to be straight appear to bulge outward in the photo. This effect is especially noticeable when shooting photos using small focal lengths or wide-angle lenses. Fortunately, GIMP has a built-in filter called Lens Distortion that is available under the Distorts sub-menu of the Filters menu. For this correction to be as painless as possible, use the original uncropped photo from the camera since the origin of the barrel distortion can then be assumed to be at the exact center of the photo. Otherwise, you would need to guess where the origin is in cropped photos and adjust accordingly. Shown below is the Lens Distortion dialog box.

For our example photo, I find that using a “Main” setting value of −7 does the trick. You may need to experiment with this and other settings to get the adjustment quite right. (See the GIMP documentation on this filter for more information.)

The next phase is the actual meat of the process. We first create image guides to mark the desired “undistorted” rectangle that we want the historical marker to fit. You can create guides by selecting the Move Tool from the toolbox and then dragging from the rulers, or by using the Guides sub-menu under the Image menu. It’s okay not to get the aspect ratio correct right now because we always can scale the image afterwards.

We then select the Perspective Tool from the toolbox and click on the photo. A dialog box should now pop up and the photo layer should now be overlaid with a grid with handles on its four corners.

We then drag the corners and try to line up the edges of the historical marker with our image guides. It make take a a few rounds of dragging to get things just right.

Once we are satisfied with the preview, we click on the “Transform” button on the dialog box. A small indicator should then appear indicating the progress of the image transformation. (It helps to have a fast processor and lots of RAM, of course.)

The final phase of our image manipulation is actually quite trivial. We vertically or horizontally scale the photo to adjust the aspect ratio. We crop the image to remove extraneous portions of the photo. We perform color correction and sharpening as needed. And we may even need to use the Clone Tool to fill in parts of the image that are now blank because of the perspective correction. These small adjustments are all basic image manipulation steps that any experienced Photoshop or GIMP user should already be familiar with.
And there we have it! We now have a nice rectangular photo of our historical marker. For best results it helps to work with high-resolution photos because of the image distortions that we are applying to the photo. I find that with practice, the whole process can be done in under 10 minutes. One good thing about this is that you can apply the same techniques to correct other types of photos as well, such as images of paintings, posters, and even architecture.
Comments
[an error occurred while processing this directive]